I made a cardboard bed frame
I made a cardboard frame for my new mattress one of my flatmates generously gave to me.
My previous bed setup was a single-person mattress on top of two wood pallets.
Another flatmate of mine, I had discovered when they first arrived, has a commercial cardboard frame. This prompted me to start
I made a cardboard beframe.
This is not the first time I've made stuff with cardboard, but it's one of my biggest/largest projects so far.
I was inspired by my flatmate, who owns a commercial cardboard bedframe. When another flatmate asked me if I was interested in getting her old two-person mattress, I accepted. I knew then that I had to get or make a new bed frame.
My previous mattress was an ancient thing, laid on two vertically aligned wood pallets. It was very squishy, and I could sometimes feel the wood underneath. Not that it bothered me much. The necessity for a frame was to make space for the mattress to breathe. This avoids mildew and the mattress rotting.
Note: I wonder what the impact is of flexible bedframes in terms of ergonomics and long-term health issues for my back...
At first, I investigated online for a commercial bed frame. To my surprise, most were around 80€ - 120€, for the sizes I needed: 200cm x 140cm. This feels far too expensive for me. So I decided to make one myself.
Planning
After investigating tutorials and DIY articles on how to make a bedframe, I decided to try and make my own design. This was informed by the particular shape of my matress.
Honorable mentions
- Instructable Article
- Another design
- This design of a simple one person bed came back a lot. I nearly used that as the base design, but I did not have full cardboard boxes.
- How To Build A Cardboard Bed Happy Beds → the pdf
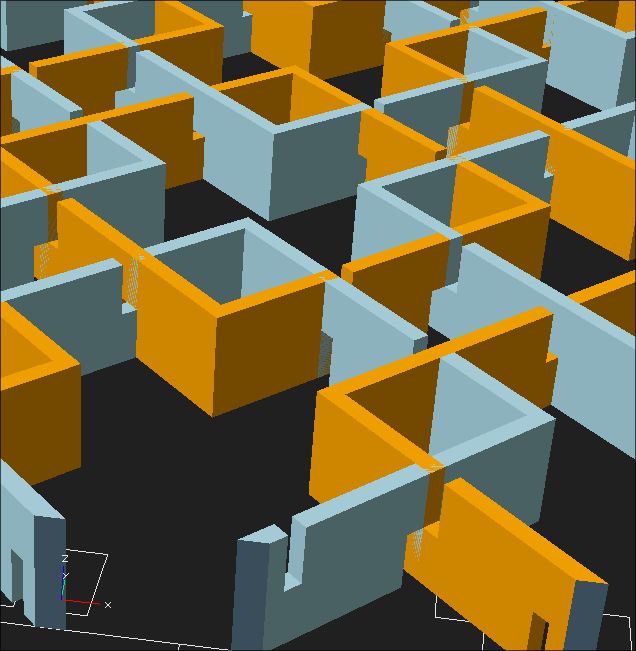
Starting with the idea of a rudementary honeycomb design, I decided to use a square shape as my base pattern. Made of four sides, it would be the smallest one-piece cardboard element of the whole frame. Those squares would interlock, with four squares crossing one square.

I then needed to find both the length and the height of a side. I made a couple of tests for:
- 40cm x 20cm
- 30cm x 15cm
- 20cm x 10cm
I decided to use the 30 cm side square, which was a good middle ground between what felt like a few huge squares (very empty) and many small squares.
Then came the moment when I tried to determine how many squares I would need to build . My first approach was to draw them by hand. This immediately fell short, since I couldn't precisely determine the spacing of squares precisely.
I remembered that there are software projects that enable users to build plans parametrically. I dug up OpenSCAD, and with the help of Claude and ChatGPT, I tried to get the following, based on the overall shape of 200 x 190 cm:
- Intersection spacing on every side, aka where to make the cuts on each side to fit the next ones, while keeping
- The number of rows and columns inside the shape (no overflow), thus giving me,
- The number of squares, and of course
- The number of sides I would need to cut.
 As you can see, I never got the cuts to align, never.
I never quite got there with OpenSCAD, so I used Inkscape instead to get an approximation of the number of squares.
 The lines near the edges are support sides. I imagined a better way to do this but have not implemented it yet. And also, the row spacing is off, since the ends are sticking out at the bottom and top.
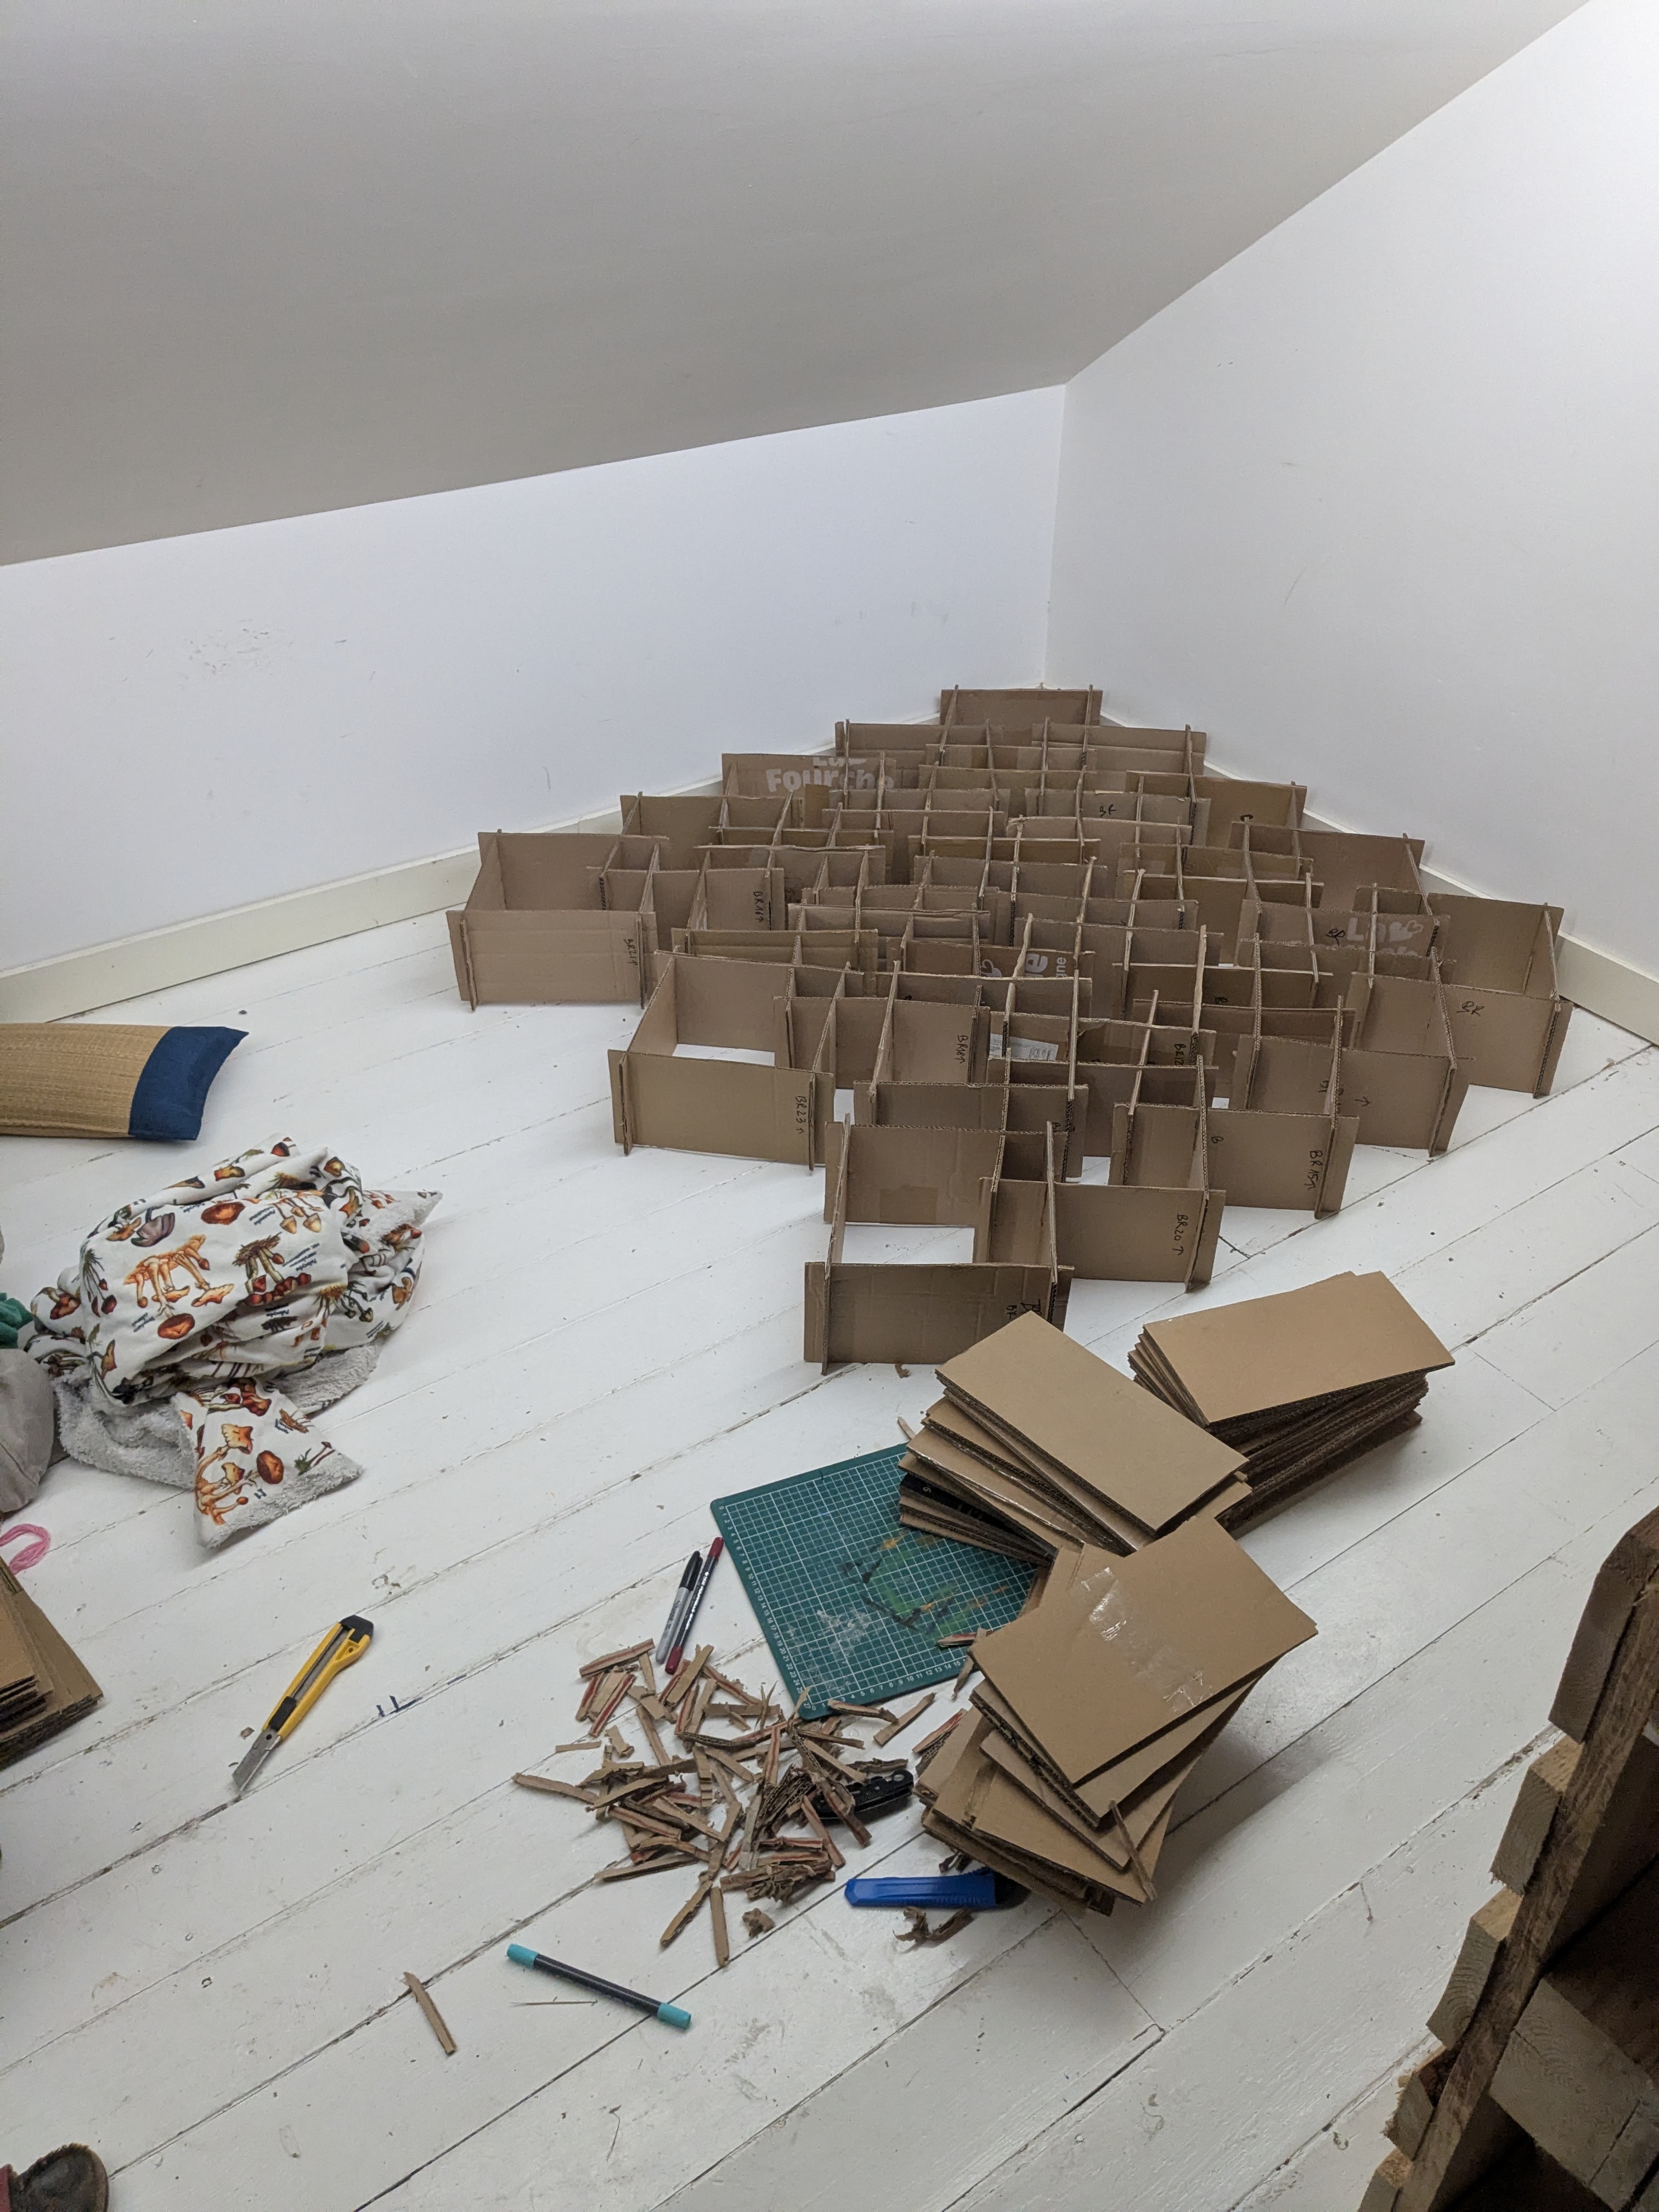
It ended up being 8 rows of 5 squares, equivalent to 40 squares, meaning 160 sides.
So I started cutting
Having already amassed a large amount of cardboard, including the box in which came the new mattress my flatmate had bought themselves, I had just enough to make a bit over half the number of sides I needed to make.

 Me calculating via the Python REPL the number of sides I had just built.
I immediately noticed while cutting that first batch that not all cardboard was made alike. I had already decided to use two-layer boards instead of single-layer ones for strength. However, I noticed that some were very flimsy, while, for example, the cardboard box from the IKEA mattress was very sturdy and hard.
I wonder if I can consistently find good cardboard based on brands or object types. Is the cardboard better if not made in part with recycled material → grey-colored cardboard?
Moreover, I discovered that there is a way to cut this cardboard. I made the mistake of cutting along the gaps for the length of the sides. It occurred to me that it should be the other way around.
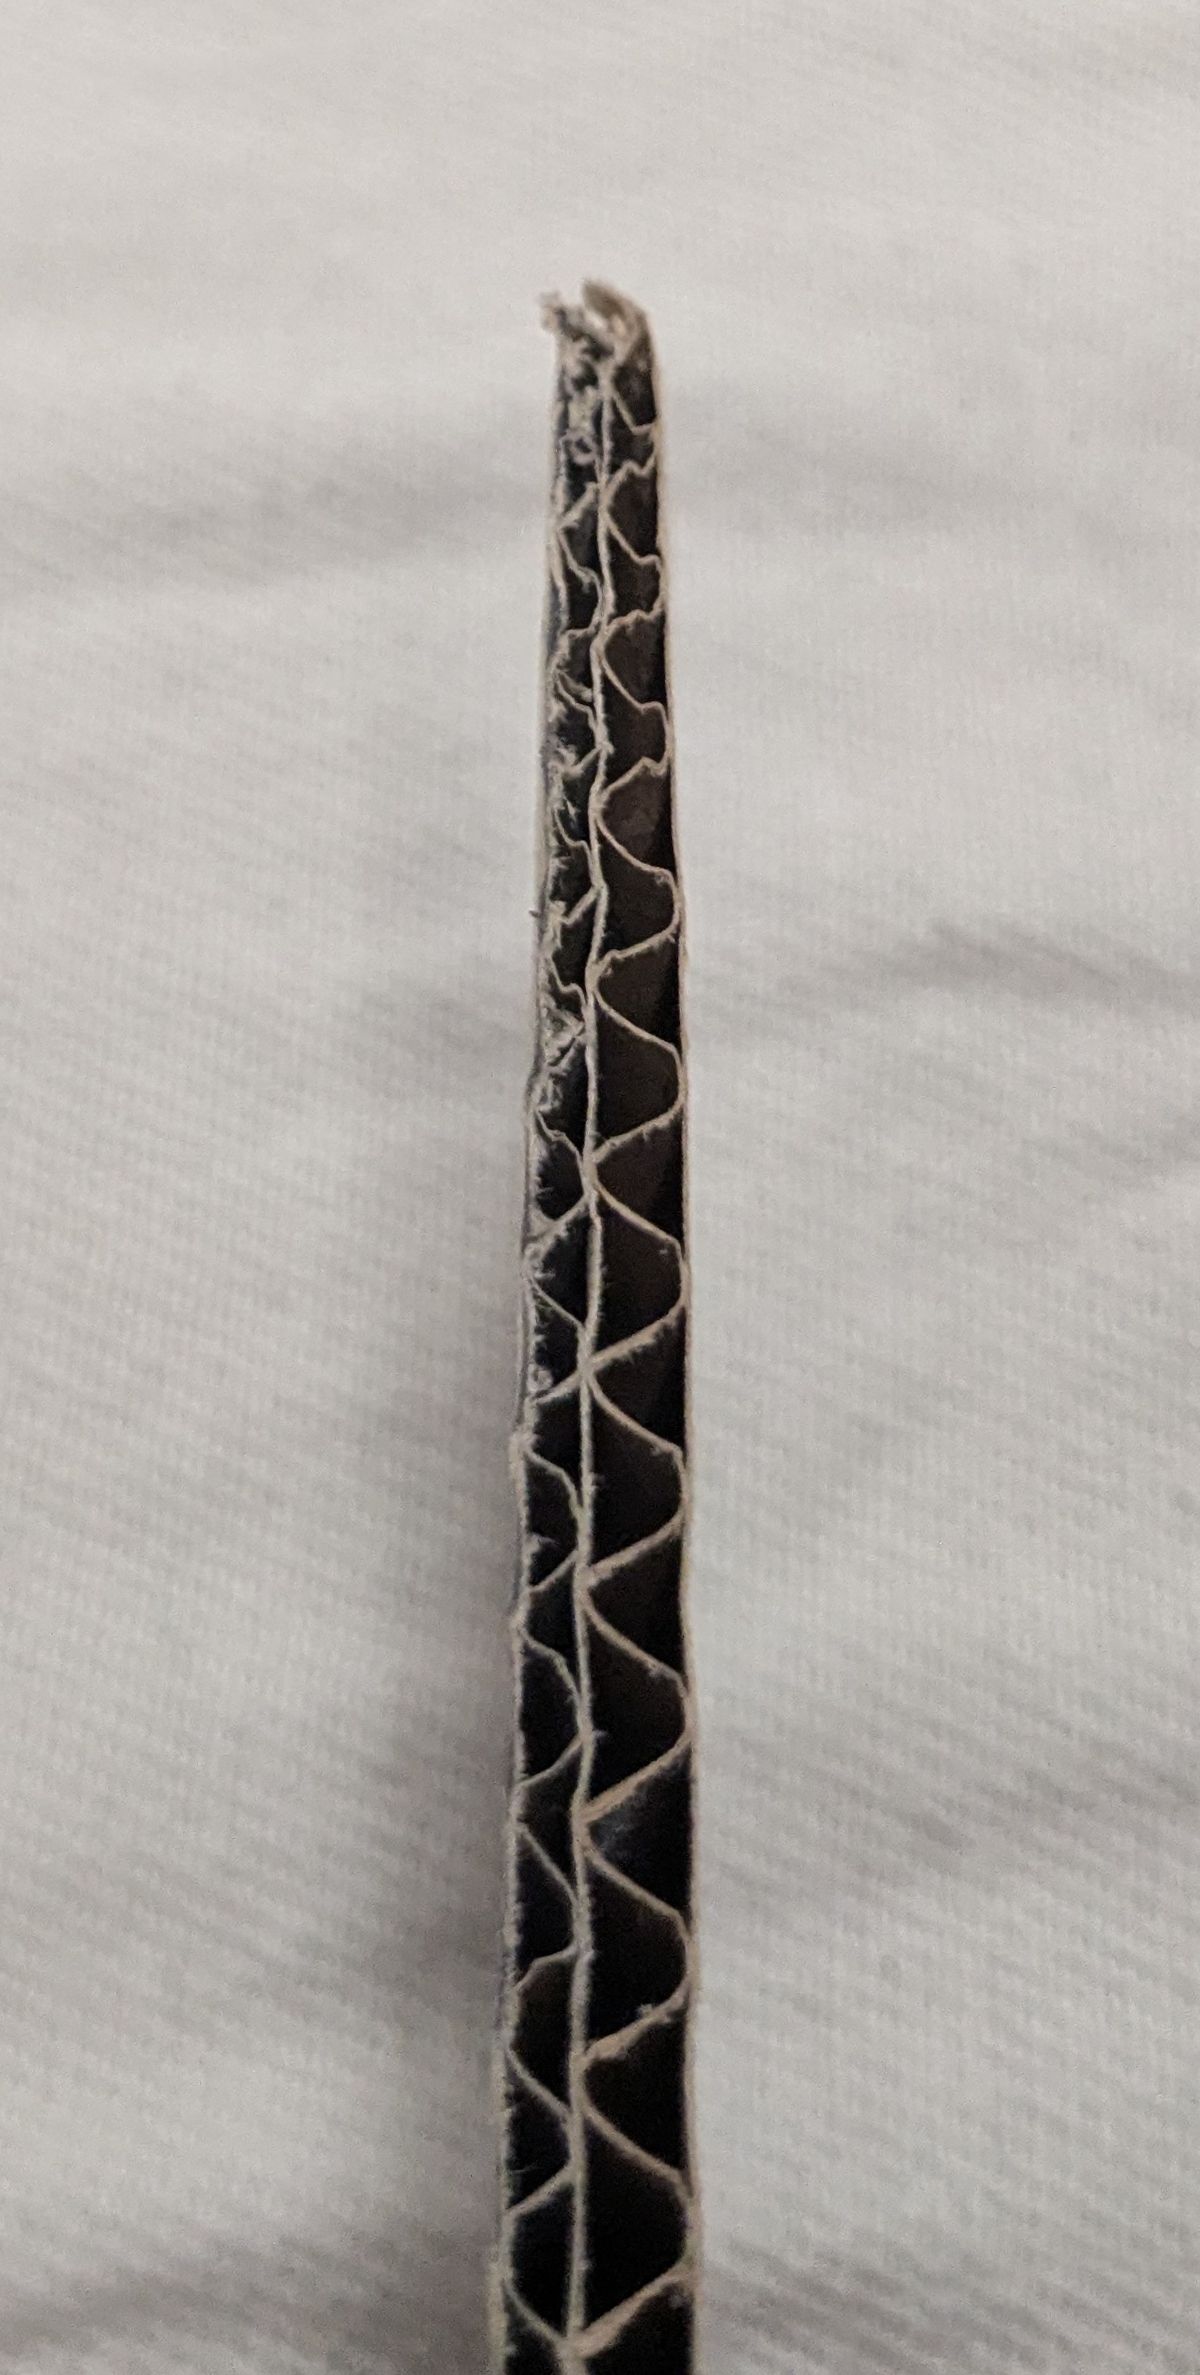 Against the Grain
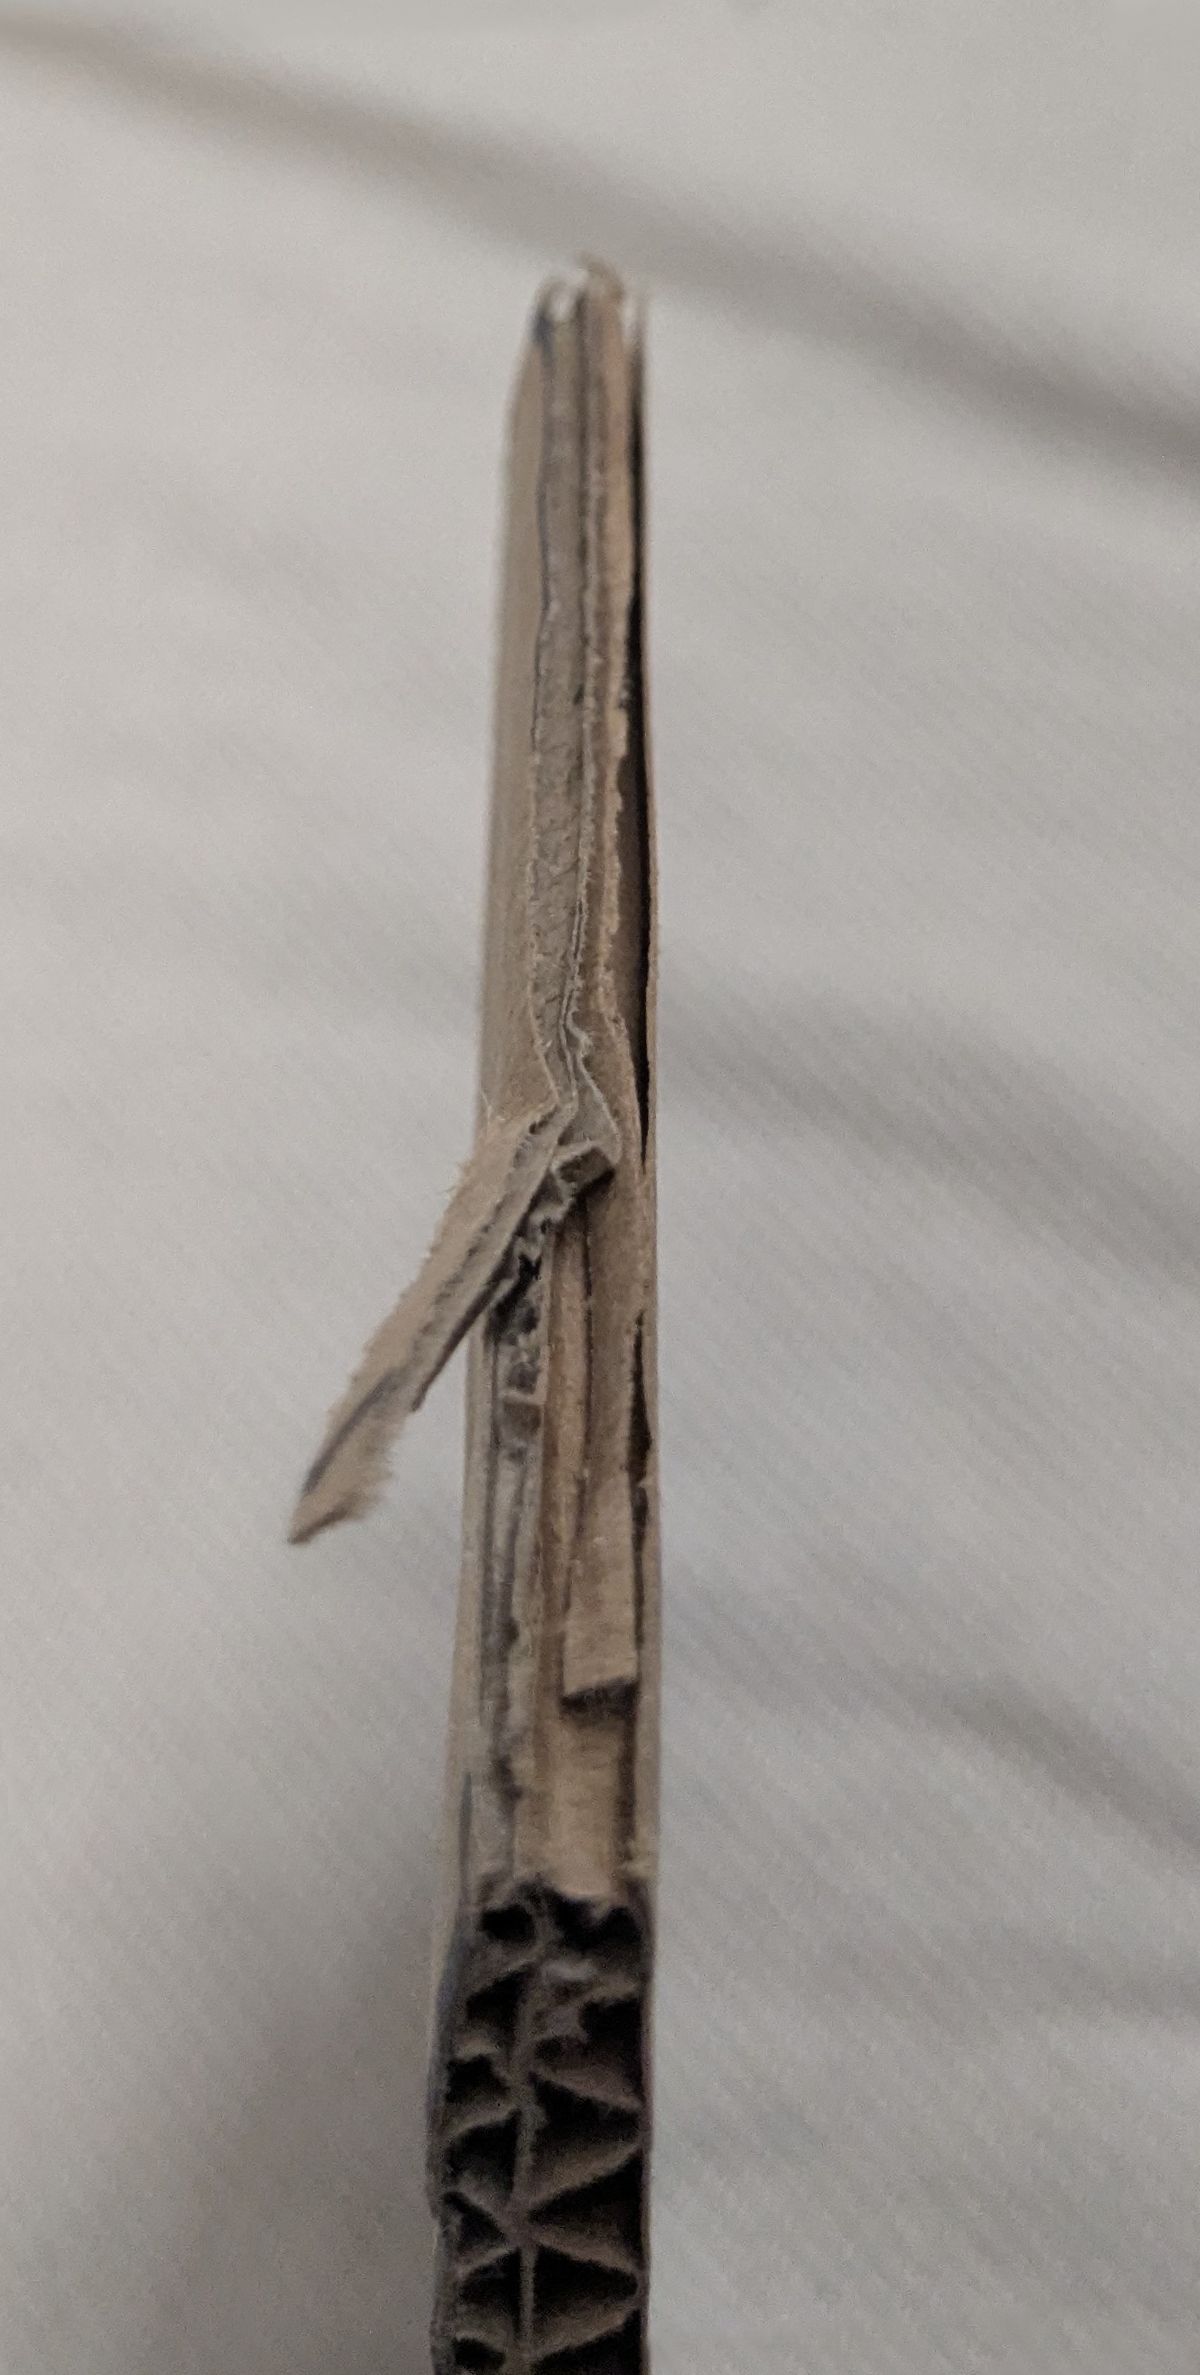 Along the Grain
In a sense, against the "grain" of the cardboard is stronger than with. I made that mistake with about 50% of the sides. I curse that later. :D
It took me an evening to make the first 93 sides and another half to make the rest.
After the first batch, I decided to start building the squares to see how they looked in terms of size and, most of all, in terms of height.
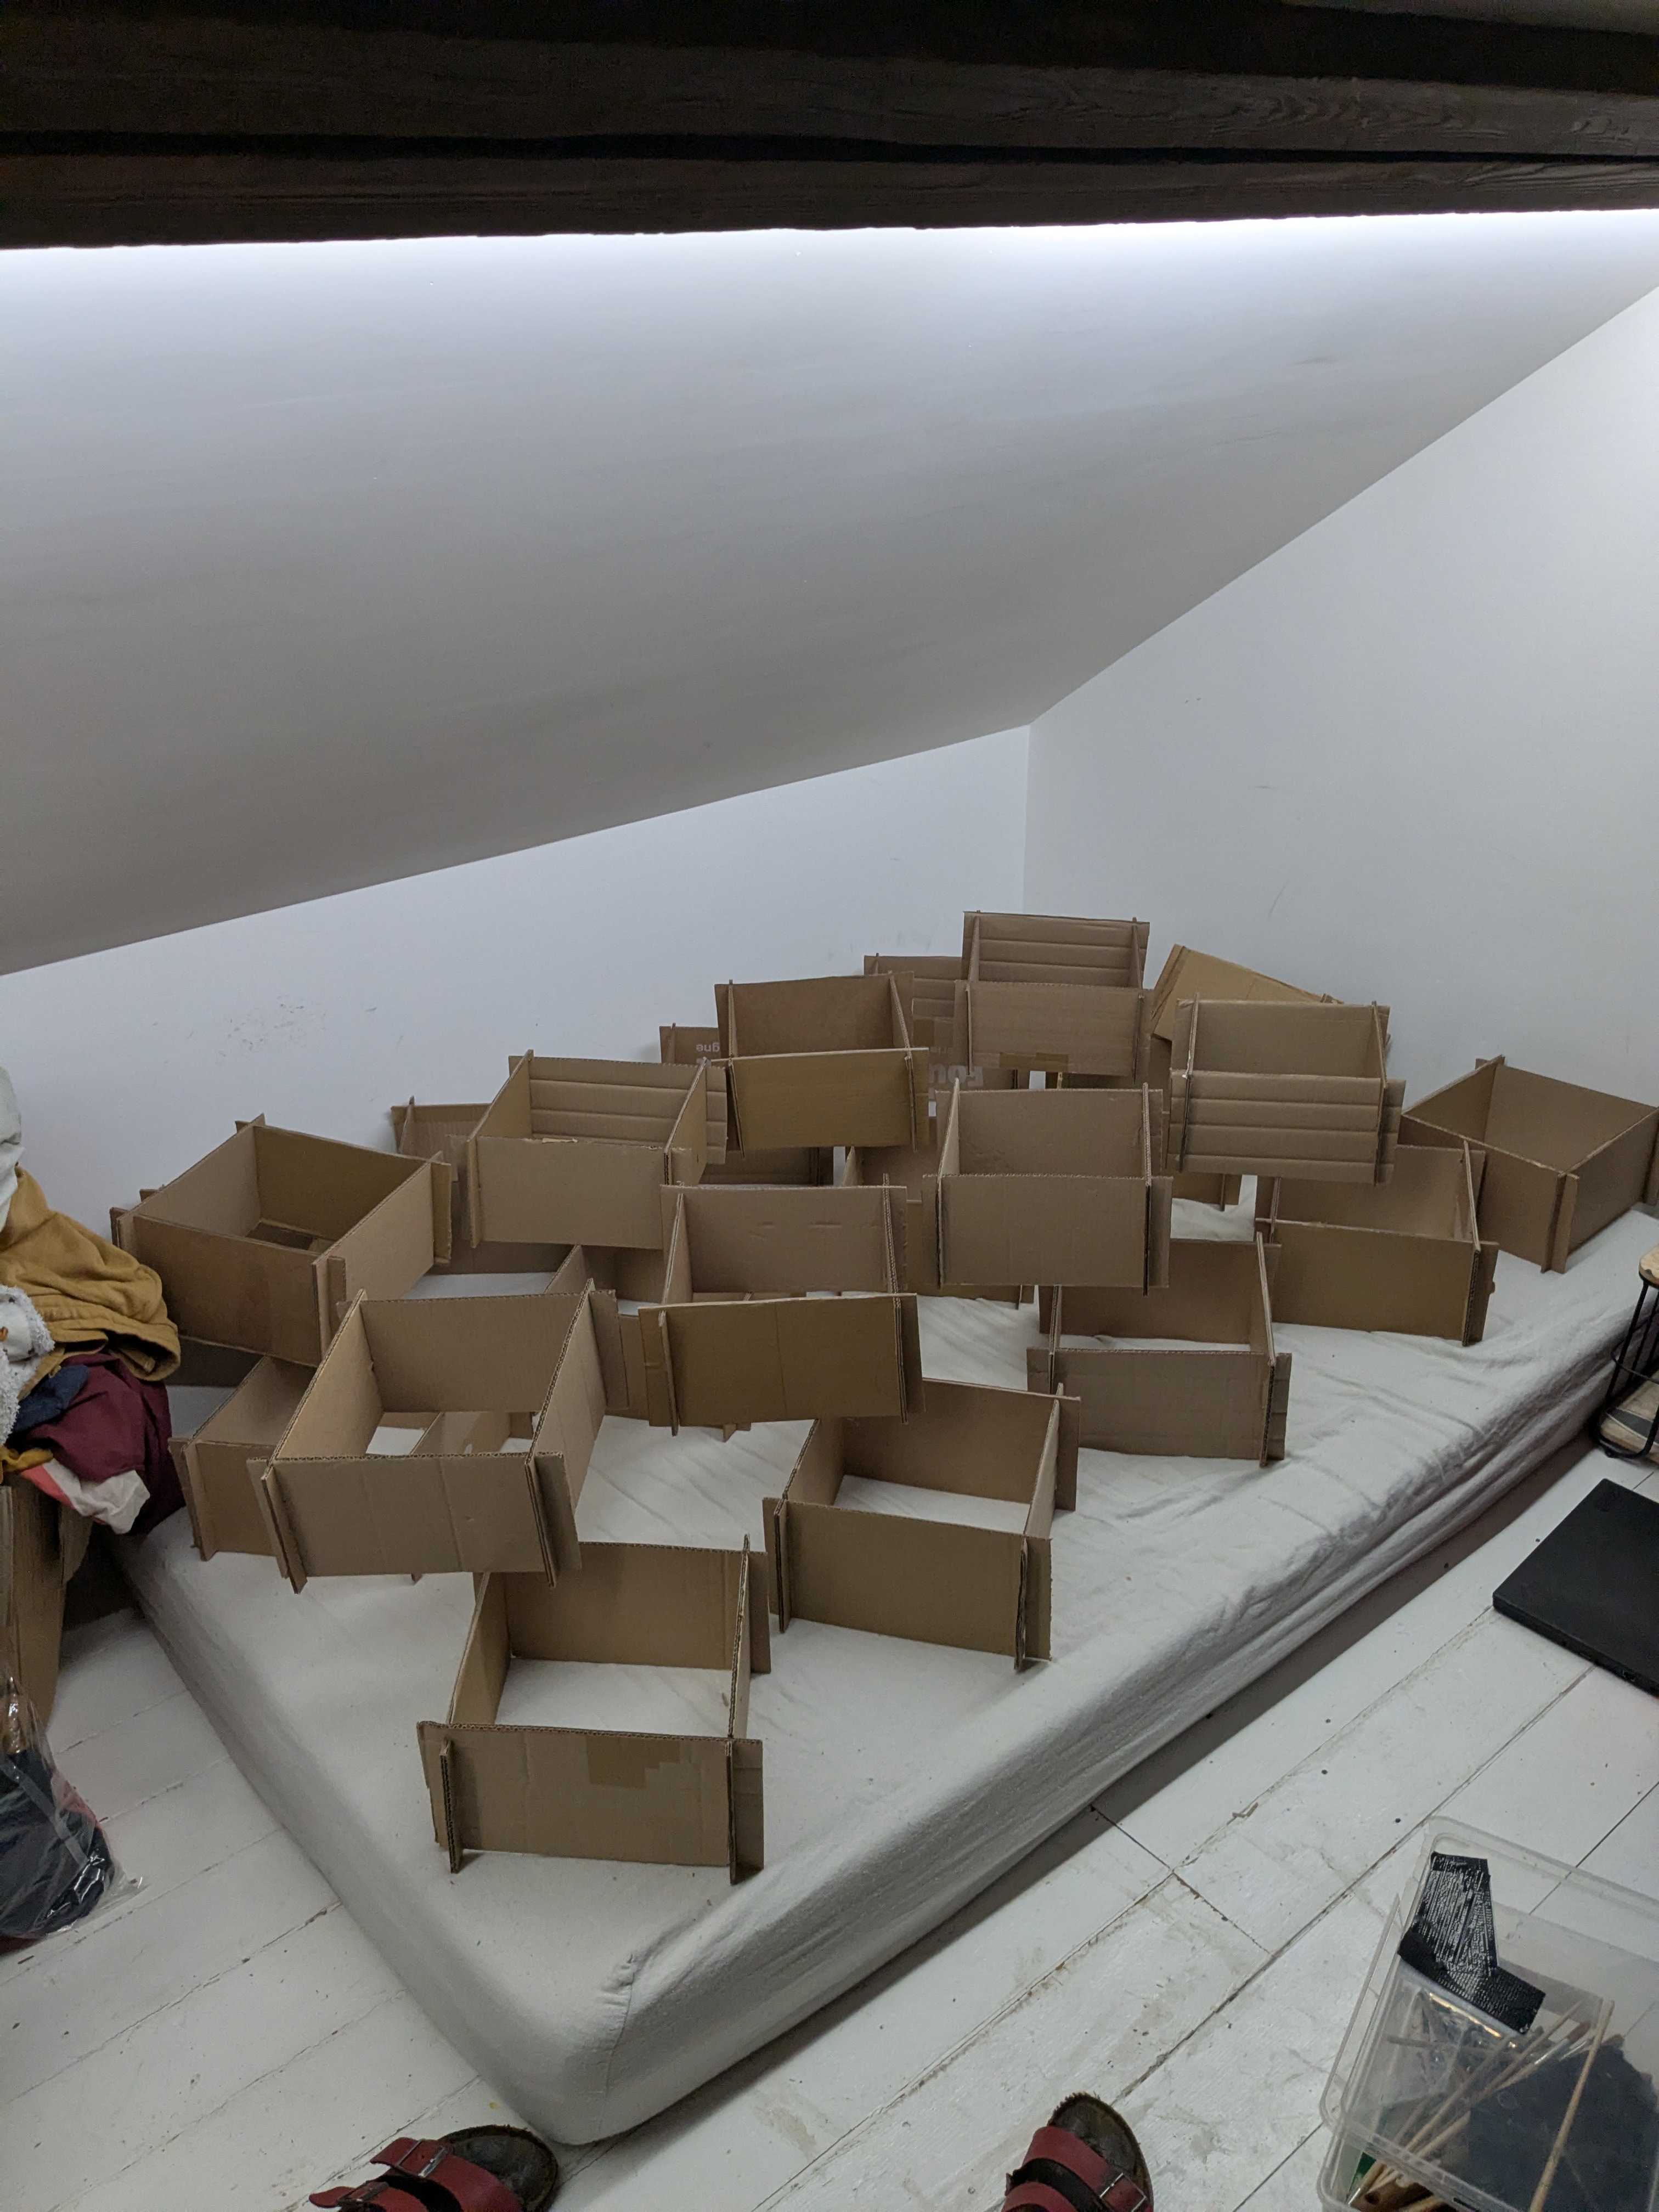
See, since when I had set the sizes for my squares, I had started to wonder if 15 cm was not too high. It was the same size as the wood pallets I had used for two years. I was a bit stressed that it might be too high, pushing me, when on top of the mattress on top of the frame, into the low ceiling.
I tested out with the 23 squares I had so far. It was fine, and I was surprised that the frame actually held my weight, with half the squares not in place!! That gave me confidence to continue with the project and the height I had chosen.
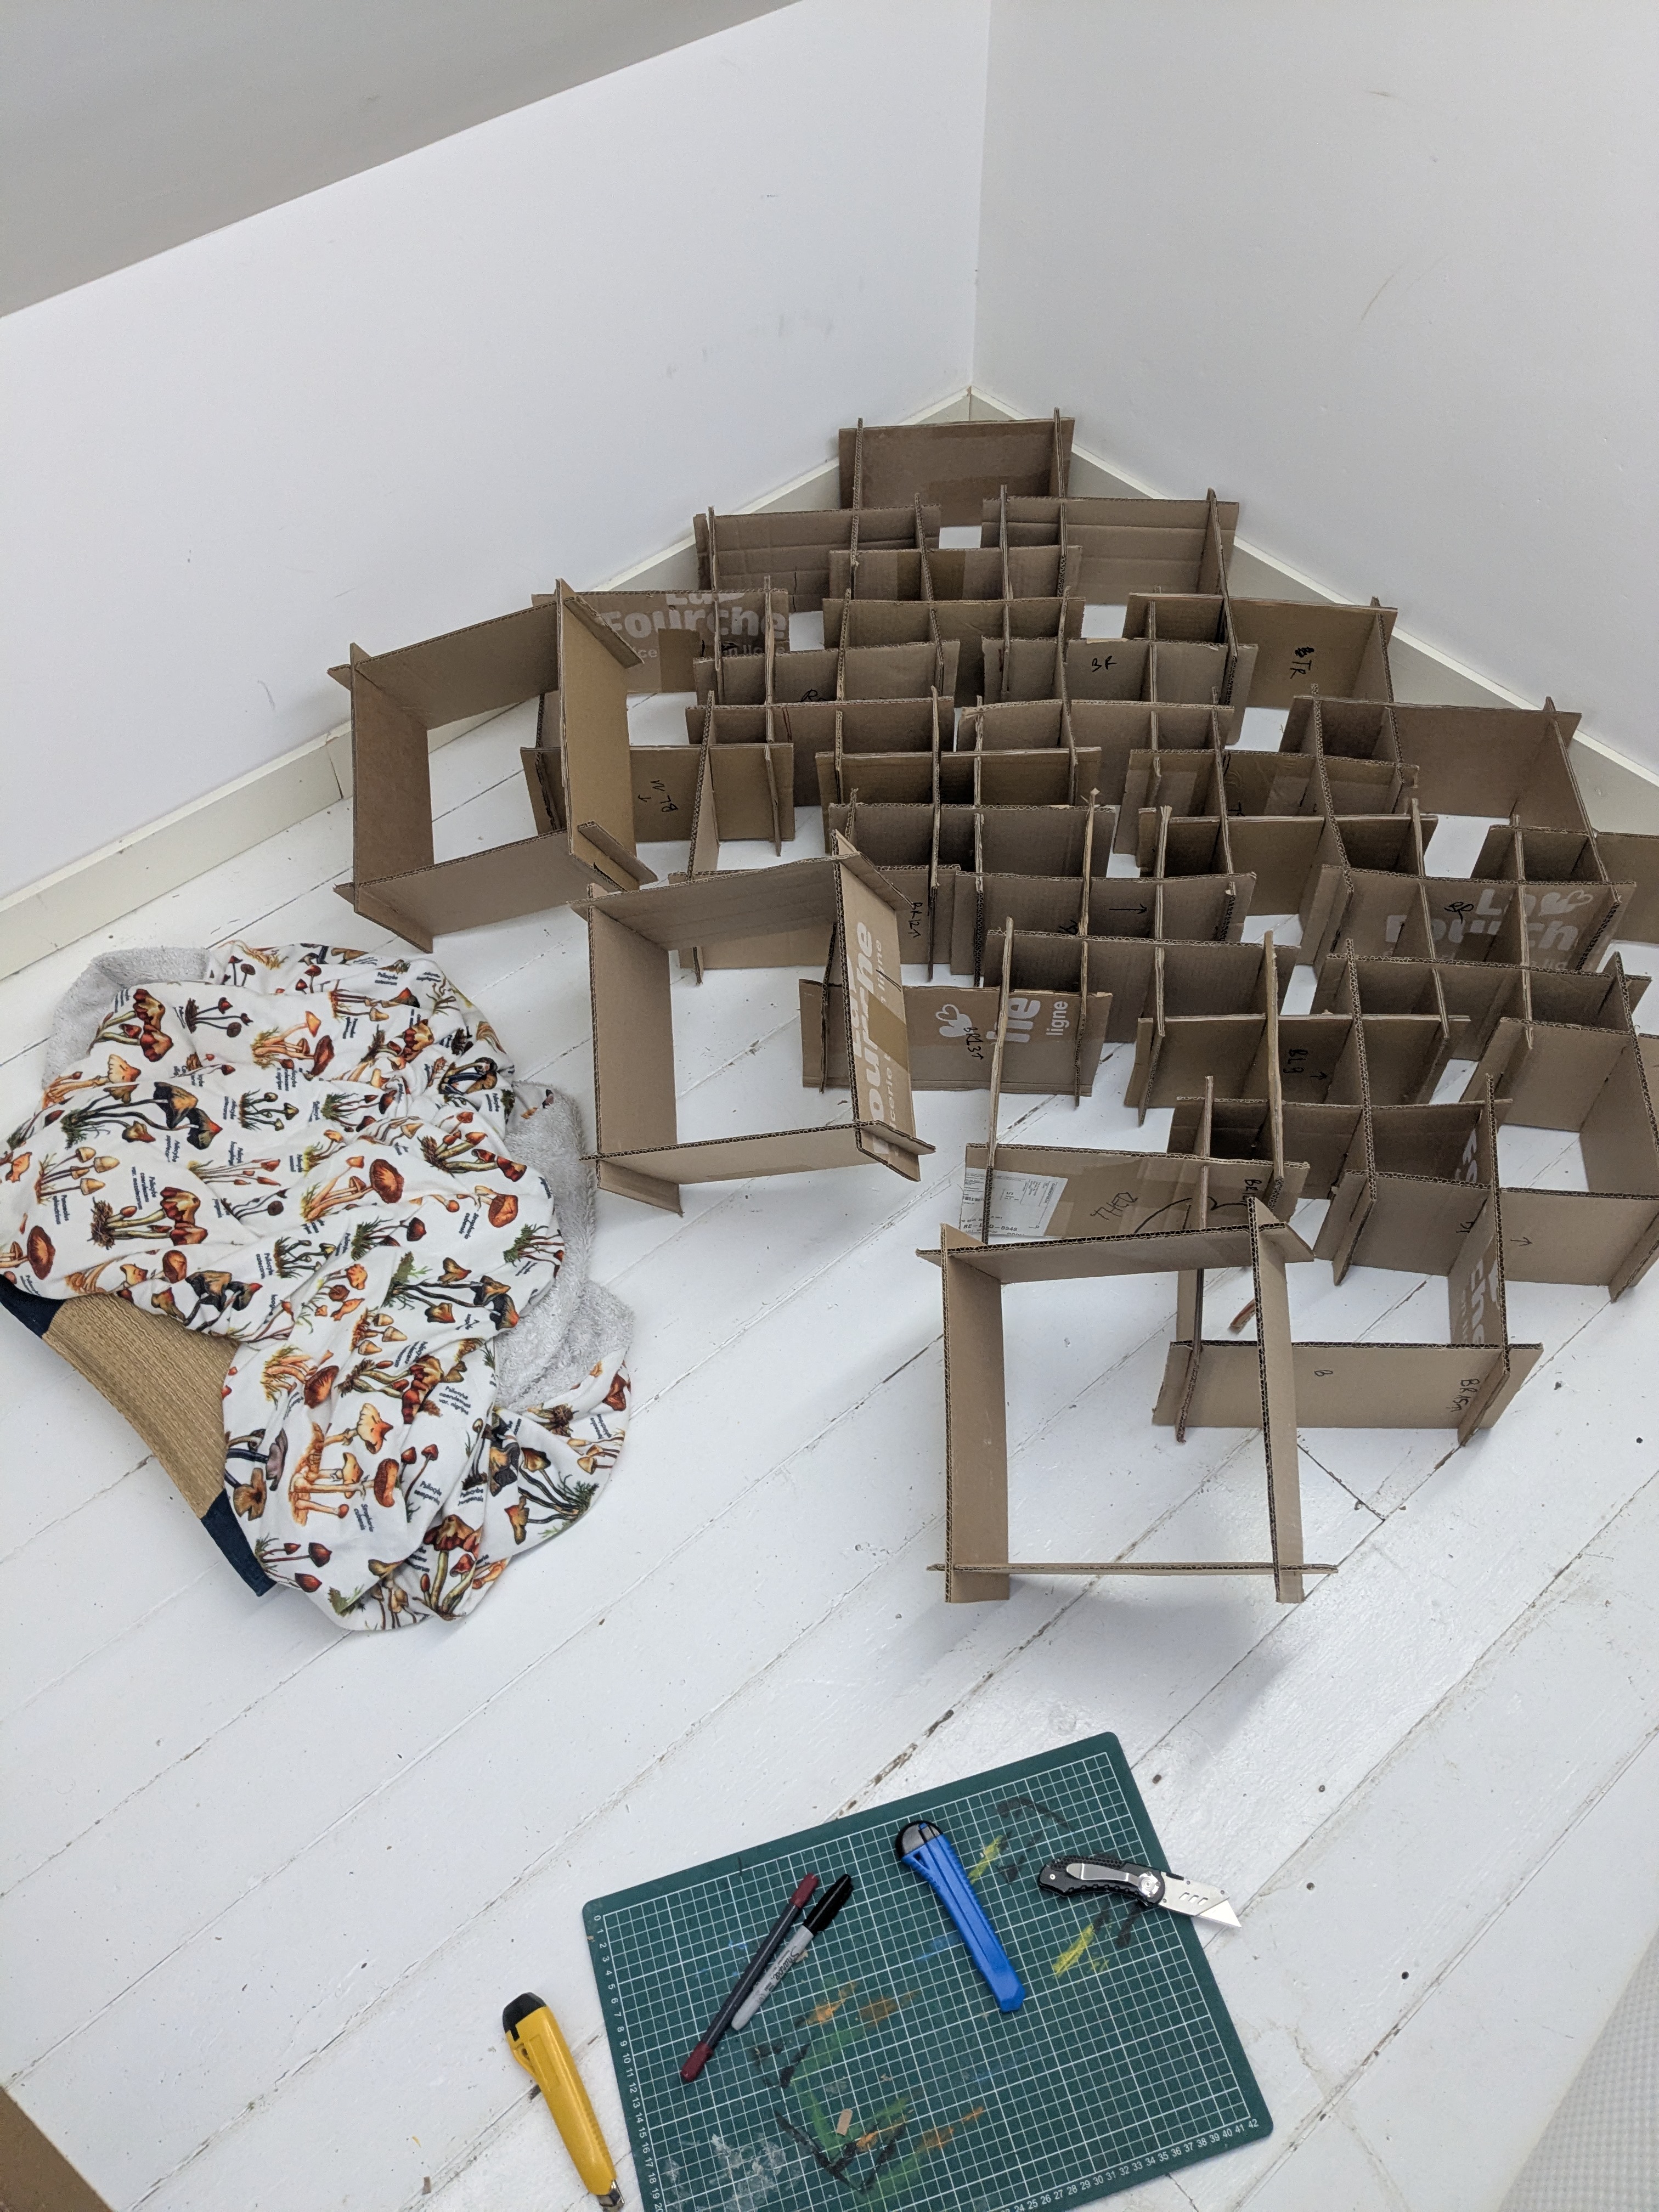
At this point, I had used up all of my decent cardboard. I waited a couple of days until the next time the yellow bags (cardboard paper) period arrived. At around 20h, I went out in my neighborhood searching for cardboard boxes left in the street for recycling.
I found SOOOOO much cardboard. I wish I had a picture, but I forgot to take one. Two huge boxes filled with decent-quality cardboard. That evening, I cut up a lot more in preparation for making the sides. There were so many, I had to cut them up to store them efficiently and make room in my bedroom.
The next day, having some time off, I finished cutting the 67 remaining sides.
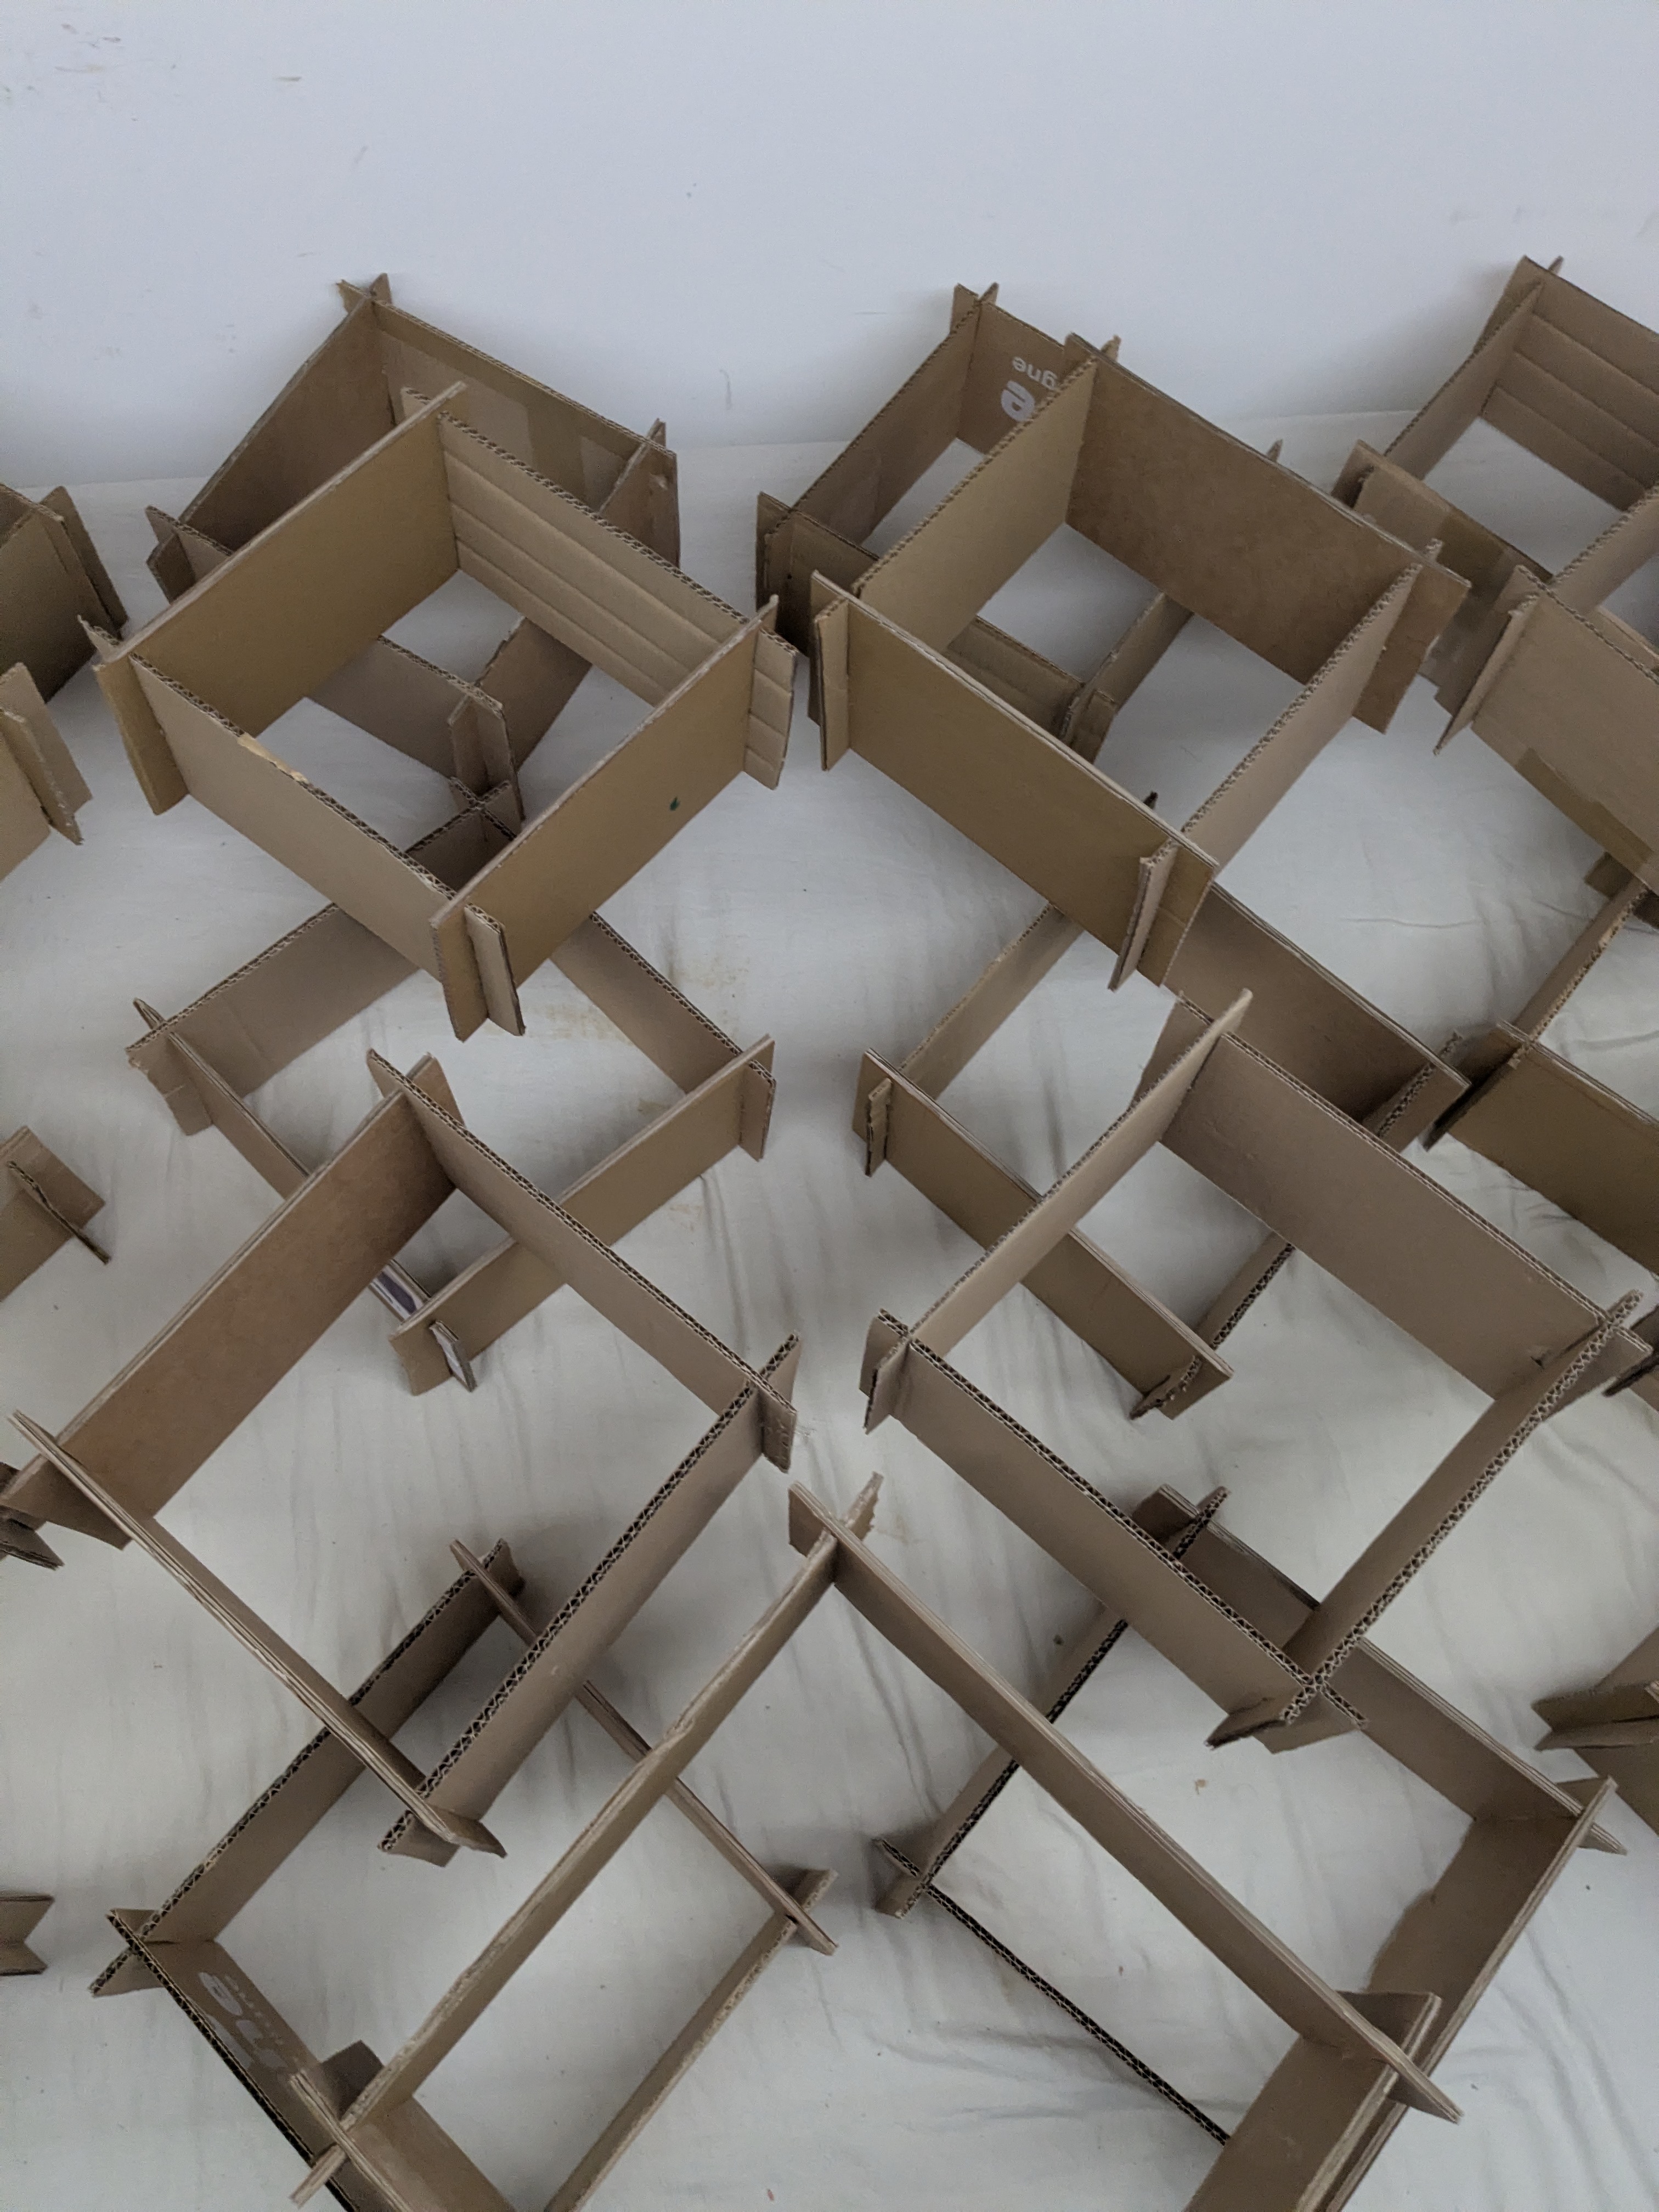
I decided to start assembling the completed squares I had into the lattice shape I had planned. That is when I discovered that pre-assembling had been a terrible idea. Worse, I resisted disassembling everything, instead choosing to only remove sides that needed cutting. I thought it was a good idea...
It wasn't! I ended up removing sides anyway, since all sides needed inner cuts to welcome the side of an adjacent square. After two rows, I decided that I was only going to assemble the squares sliding down on the ones already assembled.
This was tedious work, since I had to both try and keep the shape and spacing correct while making cuts that fit the already present lattice. Since all cuts weren't the same and did not have the same placement, this got gnarlier each row. After a long while, I managed to wedge the last square in the lattice for the pre-made squares.
I continued with the rest of the sides. I tried to find the logical next set of sides to keep adding to the lattice without trying to complete each square. Instead, I kept looking for the next set of sides that could be inserted from above towards the bottom. This way, inner cuts were far easier, and I did not have to disassemble and reassemble every time.
I finished in sweat and with a sore thumb, like every other evening when I had cut cardboard.
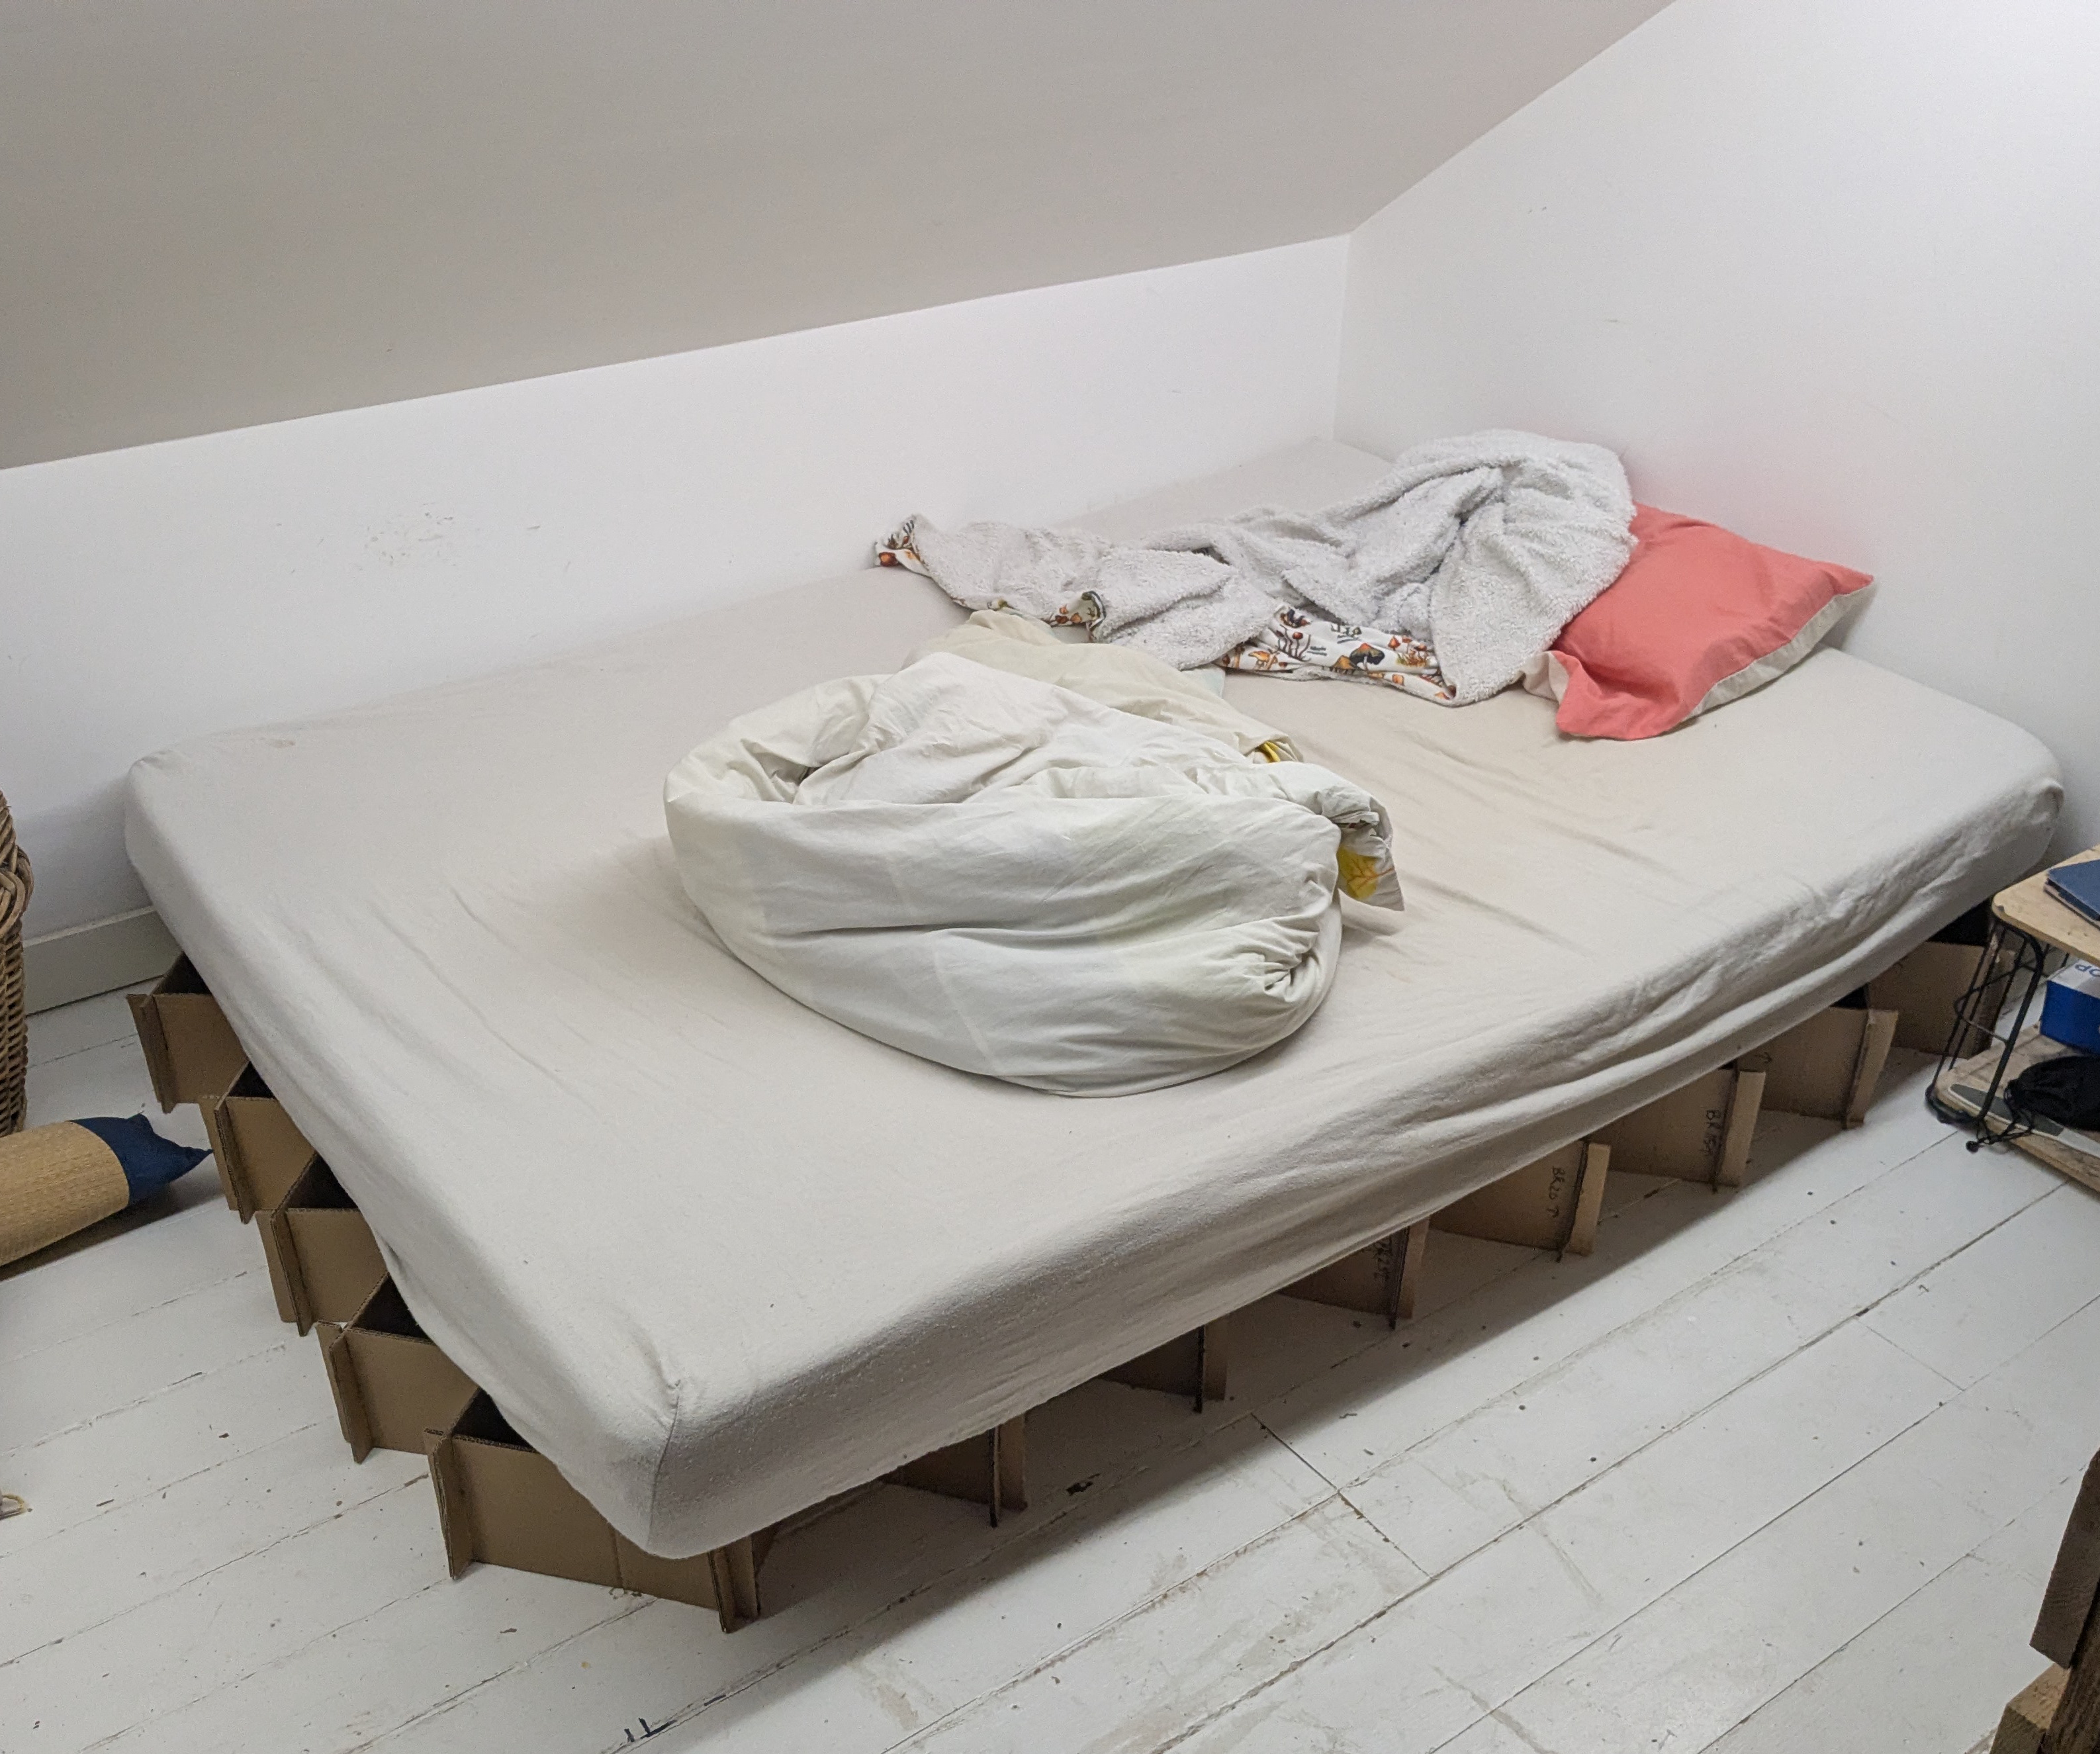
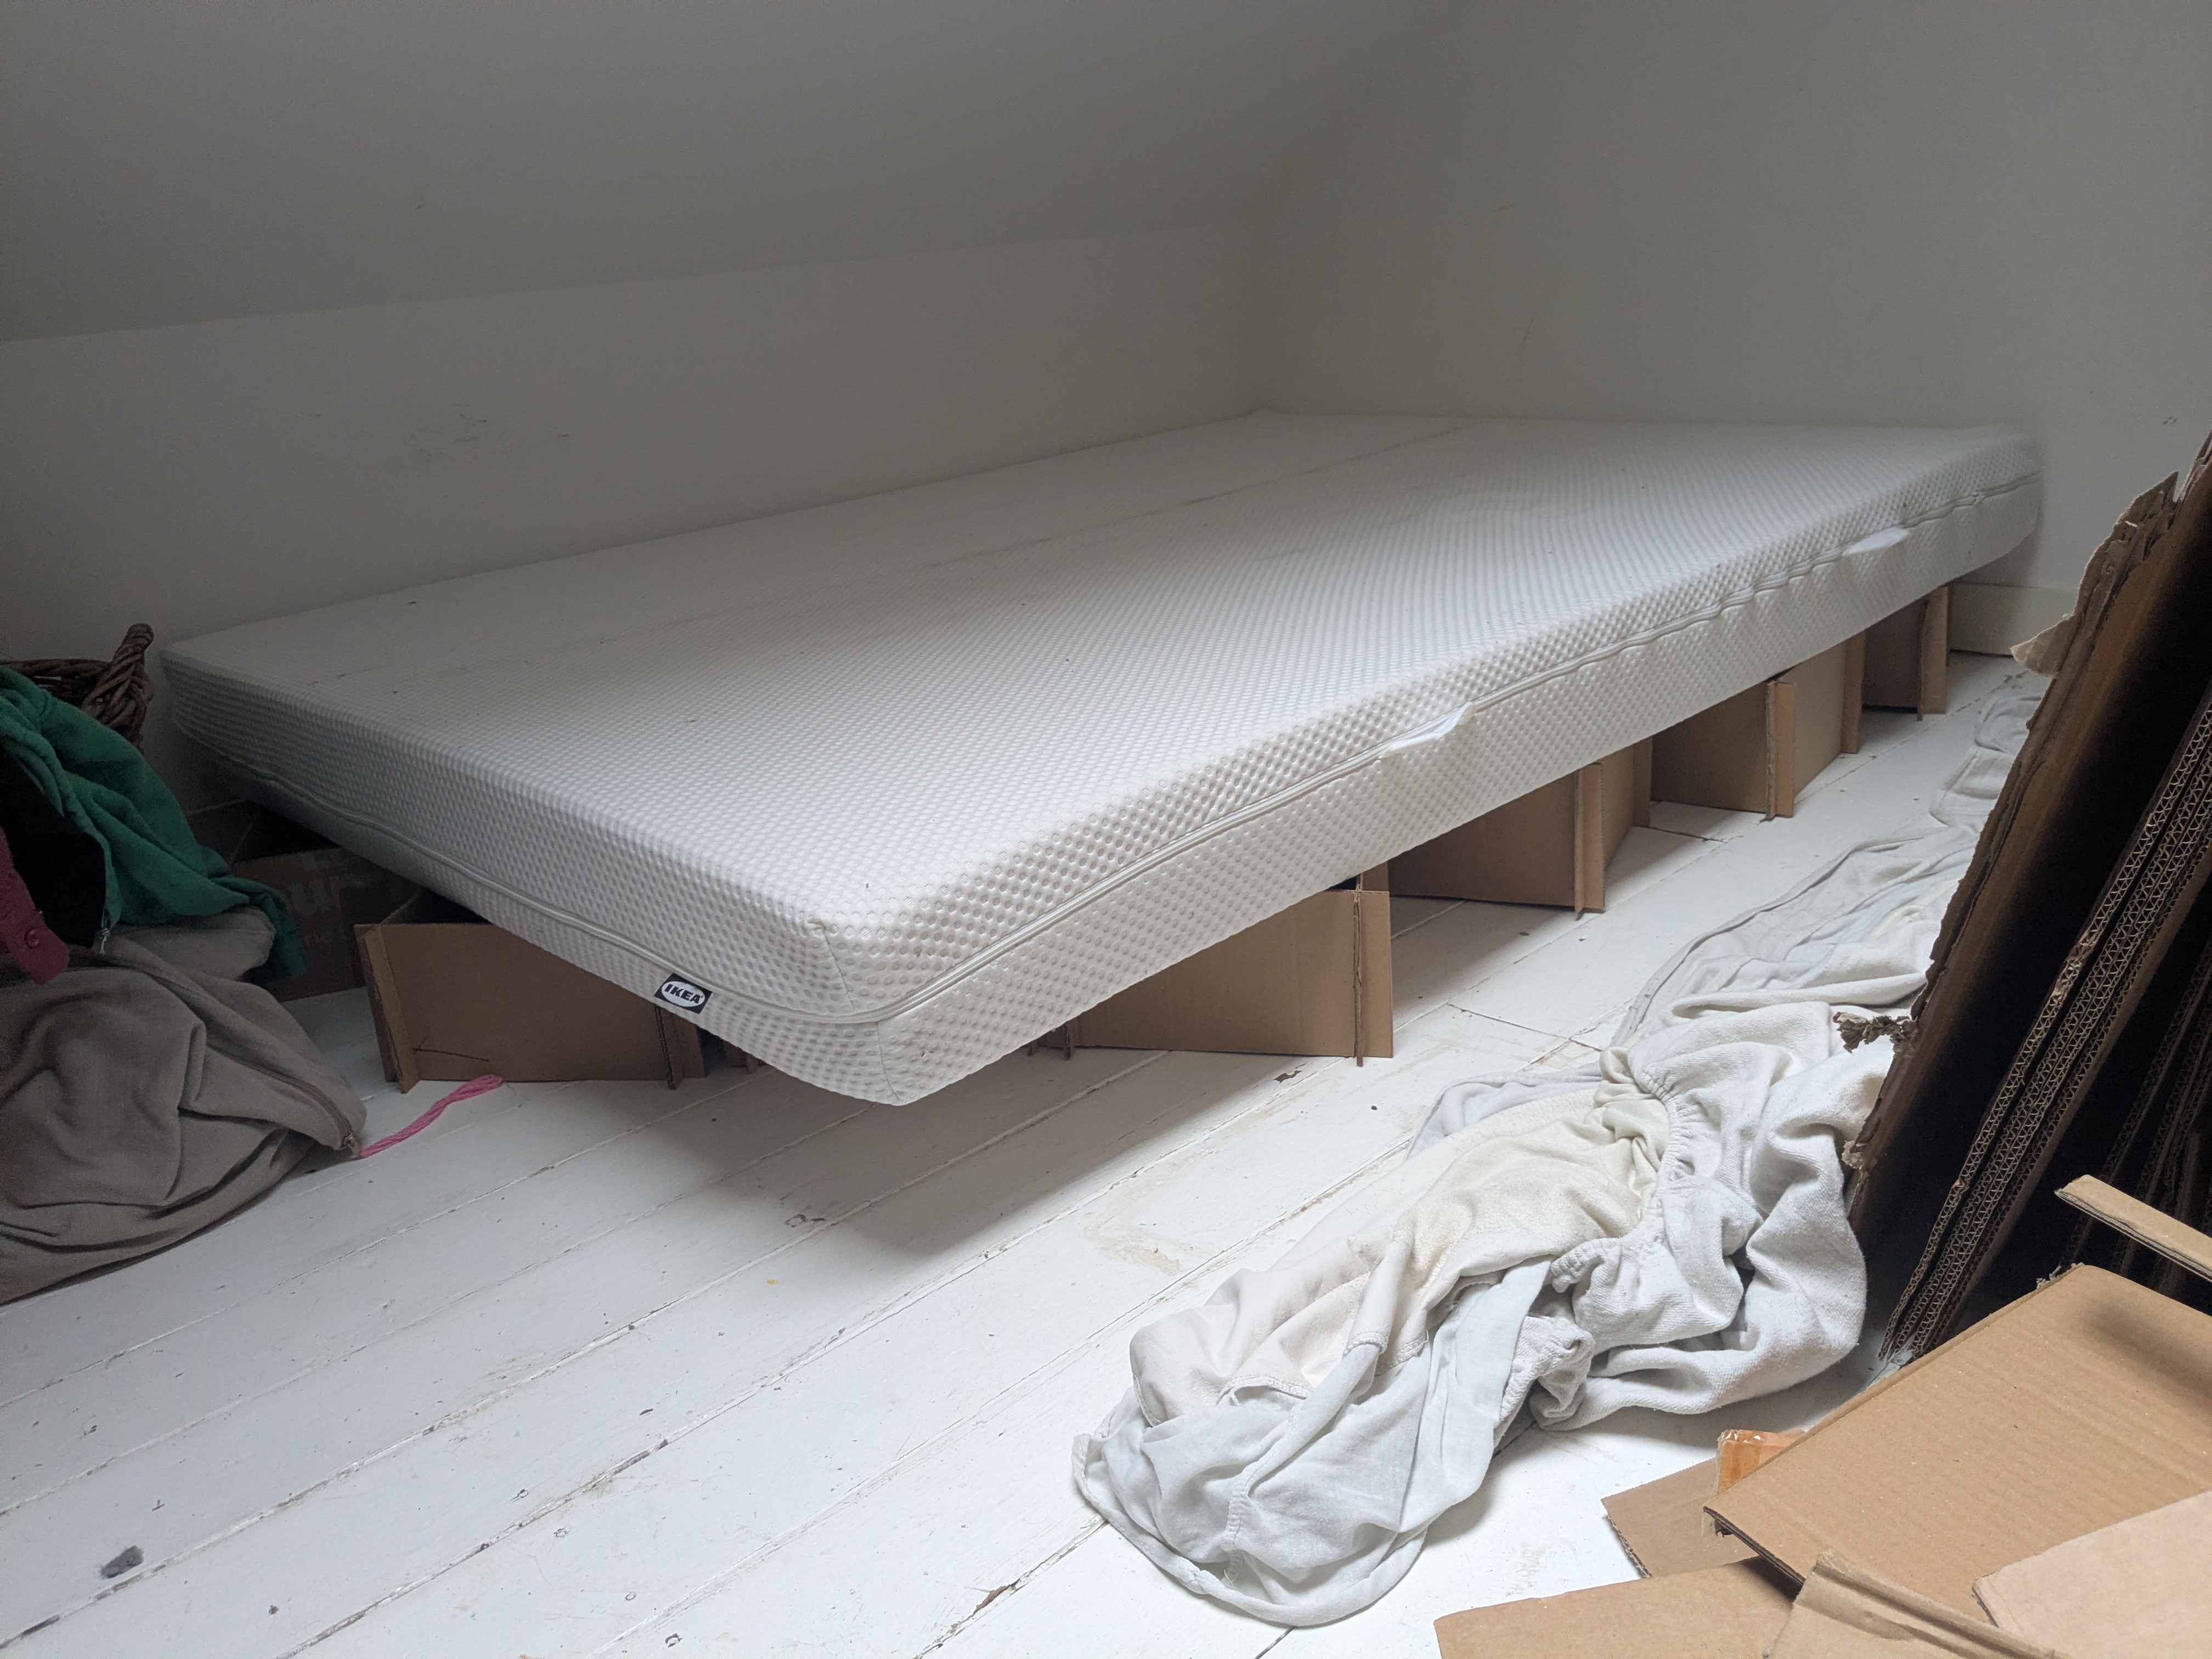
I plopped the mattress on top of the lattice and confidently lay down on it.
And it worked !!
I've shamelessly used the same picture from the top. :D
This was a couple of days ago. I have since then slept in the bed, and I can happily say that... I'm going to have to work on this some more. The whole is very solid, except that the external triangles are less held down by crisscrossing cardboard. They are more empty. I need to add a supporting crisscross to the external squares to make them more solid. Also, I keep shooting in the sides with my feet when I want to get in bed. Eyeballing spacing was not such a great idea?
On the plus side, the bed being now quite elevated has an interesting side effect: this part of the room now feels to me much more organized and well used.
I now wonder if using a laser cutter and carefully measuring the correct cuts to make squares and sides would be easier to assemble and if the size of the overall lattice would yield a consistent size... To be explored.